Metatogger Documentation - User Guide
Installing Metatogger
Section titled “Installing Metatogger”What are the software requirements?
Section titled “What are the software requirements?”Metatogger requires the prior installation of the Visual C++ runtime 2015-2022 (x64). This runtime is installed automatically if necessary during the software installation. The user does not need to worry about it.
In which languages is Metatogger available?
Section titled “In which languages is Metatogger available?”Metatogger is available in English, French, Italian, Spanish, German, Dutch, Chinese and Russian. By default, Metatogger starts in the Windows language if available, and in English if not. The language used can be changed at will in the software options.
Adding a language in Metatogger is very easy and does not require recompiling the software. Translation candidates are invited to contact the technical support. Thanks to its volunteer users, Metatogger is also available in Italian, Spanish, German, Dutch, Chinese and Russian.
My security software tells me that Metatogger could be dangerous. What should I do?
Section titled “My security software tells me that Metatogger could be dangerous. What should I do?”Windows SmartScreen and many antivirus programs consider files to be suspicious if their reputation and safety, depending on the number of downloads of the file in question, have not yet been established. This is, by definition, the case for any newly released file. The highly questionable behavior of Windows SmartScreen (which is not as smart as its name suggests) is known and seems assumed by Microsoft itself. As a result, each time Metatogger is updated, and for a few days afterward, rather alarming alerts may be displayed upon installation:
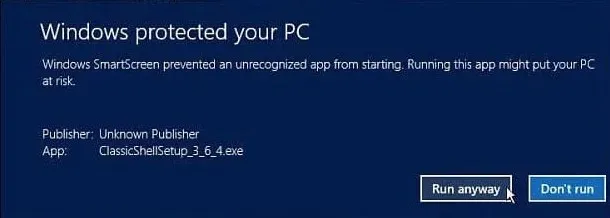
For the most zealous antivirus products on the market, the period of mistrust may even last several months, until the publisher is informed of the false positive.
If Metatogger has been downloaded from a reliable source such as this site, or via the command winget install SylvainRougeaux.Metatogger, this alert can be safely ignored. More cautious users can test the Metatogger installation file on VirusTotal, which uses over 70 different antivirus engines.
For Windows SmartScreen, the Run Anyway button will install Metatogger. As for antivirus programs, they all have options for authorizing the execution of software considered safe by the user.
A permanent solution would be to electronically sign Metatogger binaries with an electronic code-signing certificate, but these are particularly expensive and have to be renewed periodically. Increases in the price of these certificates (x4 in 2023) have overcome the goodwill of Metatogger’s volunteer developer.
What audio file formats are supported?
Section titled “What audio file formats are supported?”Metatogger’s original goal was to promote open standards in digital multimedia, especially those of the Xiph foundation (Ogg Vorbis, Opus, FLAC, etc.), hence the “ogg” in the product name. The first version of the software therefore only supported these file formats.
Today, Metatogger supports the most popular audio file formats: Ogg Vorbis, Opus, native FLAC, MP3, M4A (AAC and ALAC) and Windows Media Audio (including its professional and lossless variants).
Metatogger uses the open-source TagLib library internally to read and write tags in audio files.
Can I customize the look and feel of Metatogger?
Section titled “Can I customize the look and feel of Metatogger?”Metatogger offers a number of graphic themes to suit every user’s taste. Themes can be selected from the File tab of the ribbon. You can switch between themes using the Alt + Left or Alt + Right keyboard shortcuts, and see the results immediately.
What advanced settings are available?
Section titled “What advanced settings are available?”Some of Metatogger’s advanced settings cannot be modified via the graphical user interface. These settings are saved in a JSON file which can be opened in a text editor (e.g. Notepad or Visual Studio Code) by clicking on Edit advanced settings… under the File tab of the Ribbon. Only modify them if you know what you’re doing.
The following advanced settings are available:
- CheckUpdatesOnStartup:
trueto automatically check for a new version at Metatogger startup, otherwisefalse(default value:true); - MinId3Version: minimum version of the ID3 v2 standard to be used when recording an MP3 (
"id3v23"or"id3v24", default value:"id3v23"); - MaxId3Version: maximum version of the ID3 v2 standard to be used when recording an MP3 (
"id3v23"or"id3v24", default value:"id3v24"); - SimilarityLevel: minimum degree of similarity to consider two audio files as identical, between 0.5 and 0.9 (default value:
0.9); - MaxConcurrentConnections: maximum number of simultaneous Internet connections to use, between 1 and 8 (default value:
8); - MaxConcurrentComputes: maximum number of CPU cores to use for computationally intensive tasks, between 1 and the number of CPU cores of the current machine (default value: the number of CPU cores of the current machine);
- JpegQualityLevel: graphic quality level to aim for when saving a JPEG image, between 1 and 100 (default value:
75); - FingerprintSecondsLength: number of seconds to take into account when calculating the acoustic fingerprint, to search for identical audio files, between 60 and 600 (default value:
60); - DisableCrashReporting:
trueto disable Metatogger’s automatic crash reporting, otherwisefalse(default value:false); - DisableTelemetry:
trueto disable automatic sending of Metatogger version number, and Windows version and language, on software startup, otherwisefalse(default value:false); - UseProxy:
trueif a proxy is to be used to connect to the Internet, otherwisefalse(default value:false); - ProxyAddress: if a proxy is to be used (see UseProxy), proxy address to be used (default value:
null); - ProxyUserName: if a proxy is to be used (cf. UseProxy) and requires authentication, username to be used (default value:
null); - ProxyPassword: if a proxy is to be used (cf. UseProxy) and requires authentication, password to be used (default value:
null); - OverrideID3Latin1EncodingCodepage:
trueto enable reinterpretation of Latin-1 characters in ID3 tags when Latin-1 encoding is not the appropriate one, otherwisefalse(default value:true); - ID3Latin1Encoding: if reinterpretation of Latin-1 characters in ID3 tags is required (see OverrideID3Latin1EncodingCodepage), number of Windows code page to use (default value:
0); - MaxSecondsDifferenceForMatching: difference in seconds beyond which Metatogger considers that two files cannot be identical, regardless of their content (default value:
10); - ProtectFilteredItems:
trueto prevent files filtered in the workspace from being impacted by Metatogger’s various tools, otherwisefalse(default value:true); - ProcessSidecarFiles:
trueto rename, copy and move sidecar files associated with audio files (files with the same name as the audio file but a different extension), otherwisefalse(default value:true); - DefaultFileProcessMode: defines the default action when the path of an audio file is modified in the workspace:
Copyto copy,Moveto move,MoveDeleteEmptyFolderto move and delete the folder if it becomes empty after moving, andSoftLinkto create symbolic links (default value:MoveDeleteEmptyFolder).
Once you have modified the desired parameters in the JSON file, simply save it. The modification is immediately taken into account in Metatogger.
How to reset the settings?
Section titled “How to reset the settings?”Users can, if they wish, reset the Metatogger settings by clicking on the appropriate button available under the File tab of the ribbon.
Be careful, this reset will result in the loss of all customizations made in the software (workspace configurations, predefined tag sets, etc.). Moreover, this will lead to the reset of all default scripts.
Workspace operation
Section titled “Workspace operation”How to add audio files to Metatogger?
Section titled “How to add audio files to Metatogger?”Unlike other tag editors on the market, Metatogger does not rely directly on the file system tree. That’s why it is necessary to load audio files in the workspace beforehand. The advantage is to be able to manipulate audio files that would not be stored in the same directory.
There are five methods to add audio files to the Metatogger workspace:
- The Add Files command of the ribbon, to select one or more files;
- The Add Folders command of the Ribbon, to select one or more folders containing the audio files to be added. If one of the selected folders contains sub-folders, Metatogger will ask if it should import them as well;
- The opening of a playlist in M3U format, to load the items;
- Drag and drop into the Metatogger workspace one or more audio files, previously selected in the Windows file explorer;
- The Open in Metatogger command of the context menu of the folders displayed in the Windows file explorer.
How to remove audio files from Metatogger?
Section titled “How to remove audio files from Metatogger?”There are several methods to remove files from the workspace:
- The Remove All command completely empties the workspace;
- The command Remove Selected Items or a press on the Delete key, after having selected one or more files (Shift or Ctrl + click);
- The command Remove Checked Items;
- The command Remove Missing Items which allows you to remove physically absent files (deleted or moved), if their deletion has not already been automatically detected by Metatogger.
How to enable, disable or select items in the workspace?
Section titled “How to enable, disable or select items in the workspace?”Metatogger’s tools only act on checked items. Activating and deactivating items is therefore a common task that you should know how to do efficiently.
By default, items hidden in the workspace because they are filtered are not affected by the tag manipulation tools. It is possible to modify this behavior by setting the ProtectFilteredItems parameter to false in the advanced settings file, accessible by clicking on Modify advanced settings… under the File tab of the ribbon.
All the necessary commands are available in the ribbon:
- Check and Uncheck allow you to check (or uncheck) all selected items;
- Check And Uncheck Other and Uncheck And Check Other allow you to check (or uncheck) all selected items and uncheck (or check) the unselected items;
- Invert allows you to check unchecked items and uncheck checked items.
The automatic activation and deactivation tools are closely related to the selection.
Multiple selection works in Metatogger as in most programs: holding down the Ctrl key adds (or removes) another item from the selection, and holding down the Shift key selects (or deselects) all items in a range. The keyboard shortcut Ctrl + A allows you to select all items. Finally, it is possible to select items by drawing a rectangle with the mouse.
Other features of Metatogger can take the selection into account in their action: removing files from the workspace, saving or undoing changes, physically deleting files, showing items in the file explorer, etc.
If the items are grouped by column headers in the workspace, clicking on the group name of the group allows you to select all the items of the group, as well as its subgroups, if any.
How to filter, sort and group data in the workspace?
Section titled “How to filter, sort and group data in the workspace?”A Search command (Ctrl + F), available by clicking on the magnifying glass at the top right of the workspace, opens a search field that will filter the items by acting on the values of all the columns. The filters are case-insensitive: flac will indistinctly return “FLAC” as “flac”. Thus, only the items containing the filter entered by the user will be displayed.
A Filter editor… command is available by right-clicking on the column headers and allows you to fine-tune any combination of filters you want to apply.
The items loaded in the workspace can be sorted or grouped:
- Items can be sorted in ascending or descending order by clicking on the column headers; by pressing on Shift when clicking, it is possible to sort on several columns at the same time;
- Items can be grouped by dragging the column headers onto the appropriate bar; subgroups can be created in the same way.
How to customize the workspace display?
Section titled “How to customize the workspace display?”The workspace is very flexible, and you can customize it to your needs. Thus, it is possible to modify the display of the columns available in the workspace:
- The columns can be displayed, hidden or reorganized by right-clicking on their header and selecting the Show Column Chooser command or by clicking on the Manage Columns button in the ribbon;
- The columns can be moved by drag and drop;
- The width of a column can be automatically adapted to its content by double-clicking on the right border of the column header. A Best Fit (all columns) command allows you to automatically adjust the width of all columns visible in the workspace to their respective content;
- It is possible to freeze columns on the left or right side of the workspace so that they always remain visible, independently of the position of the horizontal scroll bar, by right-clicking on the column header and selecting one of the “fixed style” options (right or left).
How can I save my workspace configuration?
Section titled “How can I save my workspace configuration?”Once the workspace is configured to the user’s needs, it is possible to save it and restore it later. This allows you to prepare several workspace configurations adapted to different tasks. The workspace configuration that will be used when the software is started can be defined under the File tab.
Several configurations are available by default in Metatogger. Unlike the “user” configurations, the default configurations cannot be deleted.
When the user saves a workspace configuration, Metatogger asks him which aspects of the workspace he wants to save: visibility, width or position of columns, grouping, sorting, number of fixed columns.
When a configuration is restored, only the saved aspects will overwrite those of the current workspace.
How to export the workspace data?
Section titled “How to export the workspace data?”It is possible to export the selected items to a spreadsheet by simple copy and paste. Use the keyboard shortcuts: Ctrl + A to select everything (Ctrl or Shift + click for multiple selection), Ctrl + C to copy and Ctrl + V to paste the data into a spreadsheet.
It is also possible to export the data from the workspace to Excel (.xlsx) or CSV (.csv) format by clicking on the Export Data button available in the File tab. Exporting in Excel format allows keeping the groups and filters defined in the workspace.
How to record and restore a work session?
Section titled “How to record and restore a work session?”It is possible to save the work session, including the loaded audio files, the pending changes and the workspace configuration, to restore it later by clicking on the Save As or Load button on the File tab.
Metatogger work session files have the extension .jms (JSON Metatogger session). A file of this type is created automatically in case the software crashes to prevent users from losing their work in progress. This recovery file is saved as %LOCALAPPDATA%\Metatogger\Metatogger_recovery.jms.
How to play audio files?
Section titled “How to play audio files?”Playing audio files can be controlled in Metatogger with Play (Ctrl + P), Pause and Stop buttons. It is then possible to move forward or backward in the playback by moving the slider in the status bar. The line of the item being played back appears with a colored background in the workspace.
What are the colors in the workspace?
Section titled “What are the colors in the workspace?”Modifiable values, such as tags, appear in black. Read-only fields, such as technical information on files, appear in color. Items that are disabled, protected against automatic changes, appear in gray. A colored band indicates that the file is being played in Metatogger.

Tag management
Section titled “Tag management”Does Metatogger manage all the tags?
Section titled “Does Metatogger manage all the tags?”Metatogger supports all tags composed of text. The only binary tag supported by Metatogger is the Cover tag, composed of an image.
Each tag has a dedicated column in the workspace. Metatogger dynamically adds the necessary columns so that all the tags can be managed in the same way.
It is possible to manually add a column to edit any user-defined tag by right-clicking on a column header and clicking on the Add a user tag… button.
As Metatogger automatically creates a column for each new tag it encounters in the audio files, it can happen that you end up with a large number of unwanted columns, especially after deleting the corresponding tags. It is then possible to use the Clean Columns command of a column header context menu to remove from the workspace all the columns that have become useless because they have no values to display. The standard columns (Artist, Title, etc.), available in Metatogger even when no file is loaded, cannot be deleted.
Does Metatogger support multi-line tags?
Section titled “Does Metatogger support multi-line tags?”Multi-line tags are tags that contain a line break. All tags can be multi-line in Metatogger. For consistency and readability reasons, only the first line of each tag is displayed in the workspace.
The value of the tag is displayed in its entirety in the Property panel. The edition of a multi-line tag will be done through this panel, after having selected the concerned item in the workspace.
Does Metatogger support multiple tags?
Section titled “Does Metatogger support multiple tags?”Multiple tags are tags that contain several values. For example, the song “Don’t tell him” from the trio “Fredericks, Goldman, Jones” could have three tags Artist: ARTIST="Jean-Jacques Goldman", ARTIST="Carole Fredericks" and ARTIST="Michael Jones".
As a tag can have only one column in the workspace, the values of multiple tags are concatenated and separated by semicolons. The tags mentioned above would be displayed as “Jean-Jacques Goldman; Carole Fredericks; Michael Jones” in the Artist column.
Which version of the ID3 standard does Metatogger use to tag MP3 files?
Section titled “Which version of the ID3 standard does Metatogger use to tag MP3 files?”Metatogger supports ID3 v1 (read), v2.2, v2.3 and v2.4 (read and write) tags. ID3 version 1 tags are converted to version 2 when saving files.
It is however possible to force the conversion to one of the minor versions of the ID3 v2 standard. The JSON file of Metatogger’s advanced parameters, accessible by clicking on Edit advanced settings… under the File tab of the ribbon, contains two parameters: MinID3Version set to "id3v23" and MaxID3Version set to "id3v24". By default, ID3 v2.2 tags will be converted to v2.3 format, while ID3 v2.4 tags will not be converted at all. Simply set these two values to "id3v23" or "id3v24" to force the conversion of ID3 tags to these standards.
But beware, the ID3 v2.4 standard is only supported by Windows from its version 10 Creators Update (1703). If you want to be able to read your tags with Microsoft software (e.g. file explorer, Windows Media Player) provided in older versions of Windows, you will have no other choice than to set the MaxID3Version parameter to "id3v23".
Please note however that some ID3 tags can only be registered in ID3 v2.4 because they are new in this version: RELEASEDATE, TAGGINGDATE, MOOD, PRODUCEDNOTICE, ALBUMSORT, TITLESORT, ARTISTSORT. Similarly, the Genre tag(s) must be chosen from a closed list of choices in the v2.2 and v2.3 standard. Consequently, Metatogger will ignore the MaxID3Version parameter if respecting it results in not being able to register certain tags or tag values.
Are there any forbidden characters in the tag names?
Section titled “Are there any forbidden characters in the tag names?”For technical reasons related to the use of XAML and/or to comply with the Vorbis Comment standard, the following characters cannot be used in tag names: . " ' [ ] ( ) / = ^
Any UTF8 character can be used as a tag value.
Are the changes made on the tags applied directly?
Section titled “Are the changes made on the tags applied directly?”All changes made on tags in Metatogger are saved only when the user decides to do so, by clicking on the Save All Items, Save Selected or Save Checked button.
You can see on the screenshot below that the modified tags appear in bold. By hovering over the cell of a modified or deleted tag with the mouse cursor, the previous value of the tag is shown in a tooltip.

Changes can be canceled at any time by clicking on the Revert All Items, Revert Selected or Revert Checked button. This command cancels all the modifications made to the items concerned.
It is also possible to cancel the modifications applied to a particular tag, on one or more previously selected items. To do this, simply click on the Revert Current Tag button or press the Ctrl + Alt + Backspace keys, after having selected a cell in the column corresponding to the tag whose changes are to be canceled.
How to add a tag whose edition is not proposed by default?
Section titled “How to add a tag whose edition is not proposed by default?”Adding a tag whose edition is not proposed by default implies the creation of a user tag, by clicking on the link Add a user tag… of the tool Add or modify tags or in the column header context menu. A dialog box will then allow the user to add a column in the workspace.
How to tell Metatogger to complete only the missing tags?
Section titled “How to tell Metatogger to complete only the missing tags?”It can be indicated to Metatogger not to touch the tags that would already exist in the items. This allows completing only the missing tags.
For Metatogger tools with a dedicated panel, the behavior of Metatogger is indicated by a checkbox at the bottom of the panel, called Overwrite Existing Tags.
For direct application tools that do not have a dedicated panel, Metatogger asks the user for the desired behavior.
What is an identifier and what is it used for?
Section titled “What is an identifier and what is it used for?”Identifiers, used by some Metatogger tools, are variables that will contain the value of the tag they define. They are formed by the name of the tag, surrounded by the character |: |tag_name|. They will be replaced by the value of the corresponding tag. The identifiers are case-insensitive, so |ARTIST| and |artist| will return the same tag.
In addition to the value of the tags, other information can be retrieved through an identifier:
|codec_name|returns the name of the codec (e.g. MP3, FLAC, Vorbis, Opus);|codec_version|returns the version of the codec (e.g. Opus 1.3);|sample_rate|returns the sample rate (e.g. 44100, 96000);|duration|returns the duration of the piece;|seconds|returns the duration of the piece in seconds;|bitrate|returns the bitrate;|bits_per_sample|returns the number of bits per sample (e.g. 16, 24);|channel_mode|returns the sound spatialization mode (e.g. mono, stereo, 5.1);|channels_number|returns the number of channels;|filename|returns the filename of the file, without its extension.
It is also possible to use the joker identifier |fake|, corresponding to any information that Metatogger should ignore.
Identifiers are most often used as a mask. For example, if I indicate that my filenames are composed according to the mask |artist| - |fake| - |title|, a file named Coldplay - whatever - Viva la vida.flac, will allow Metatogger to deduce that the artist is “Coldplay” and that the song title is “Viva la vida”.
Identifiers can be placed within conditional blocks, materialized by the characters < and >. If one of the required tags in the block was missing, the whole block would be ignored. So, if I ask Metatogger to rename my files according to the mask <|artist| - ><[|album| #|tracknumber|] >|title|, the filename could be Coldplay - [Viva la vida #07] Viva la vida.flac, but will be Coldplay - Viva la vida.flac if the ALBUM or TRACKNUMBER tag is missing. This avoids finding characters separating missing information in the filename, such as Coldplay - [ #] Viva la vida.flac.
A contextual menu, accessible by right-clicking, makes it easy to enter masks by offering a list of the most common identifiers.
What’s the difference between embedded and external covers?
Section titled “What’s the difference between embedded and external covers?”An embedded cover is stored in a binary tag of the audio file, while an external cover is saved as an independent file, placed in the same directory as the audio files it accompanies. Metatogger allows managing both types of covers.
An embedded cover can be copied as an external cover and vice versa by clicking on the Copy Covers command in the Tools tab of the ribbon or by right-clicking on it in the Properties panel. This contextual menu also allows deleting or exporting the image.
The name of the file that will be searched by Metatogger for the external cover is configurable in the File tab of the ribbon. By default, this name is set to folder.jpg and corresponds to the name used by Windows Media Player to display the album cover in its interface.
When the cover art recovery tool is used to save images as a file in the audio files folder, two options are available to the user:
- either automatically save the image under the name defined as the external cover name;
- or let Metatogger ask the user to choose a custom name for each cover recording. This second choice is necessary when several covers have to be saved in the same folder.
Manual tag editing
Section titled “Manual tag editing”How to add or modify tags on several files?
Section titled “How to add or modify tags on several files?”Add or modify a tag on several items at the same time is done by using the tool Add or modify tags.
A click on the name of the tag allows activating or deactivating the edition on this tag. Leaving the field empty will delete the tag.
For the tag Genre, a drop-down list will allow the user to choose among the 124 most common musical genres. However, it is still possible to enter an arbitrary value in this field.
A simpler and more direct way to do this is to select multiple rows in the workspace, making sure that the column whose value you want to change has the focus. Then, simply press the F2 key and enter the new value, which will then automatically be applied to all selected rows. Be careful, unlike Metatogger’s tools, this method acts on the selected rows, whether the items are checked or not.
How can I copy the value of one tag to another?
Section titled “How can I copy the value of one tag to another?”It’s possible to use identifiers in input fields such as Original Pink Floyd song, performed by |artist|, with the identifiers replaced by the corresponding tags. Using an identifier as the target value is still the most efficient way of copying the value of one tag into another, so there’s no need to use a script to do this.
How to add the same tag several times?
Section titled “How to add the same tag several times?”Metatogger supports multiple tags. You just have to separate the different values in the tag input field by a semicolon. Thus, entering Artist 1;Artist 2 in the Artist field will create two ARTIST tags, containing respectively “Artist 1” and “Artist 2”.
Another way to do this is to uncheck the Overwrite Existing Tags box in the Add or modify tags tool. The entered tags will then be added to the existing ones.
How to automatically number tracks from the same album?
Section titled “How to automatically number tracks from the same album?”A list of choices, available in the Track number field, allows you to choose an Automatic option, which will automatically increment the track number for each identified album. The tracks will be numbered in the order in which they are displayed in the workspace.
How to delete massively tags?
Section titled “How to delete massively tags?”The Remove unwanted tags tool allows deleting tags the user no longer needs.
Just click on the name of the tags to be deleted in the tool. The tags whose deletion is requested appear in red.
Automatic tag editing
Section titled “Automatic tag editing”How to get tags that may be contained in the path or filename?
Section titled “How to get tags that may be contained in the path or filename?”The tool Get tags from file name or its path allows getting tags from file name or path.
To do so, you should indicate how the file names (without the extension) or file trees are constructed using the appropriate masks. The masks are composed of identifiers.
For the definition of the file tree, it is necessary to specify only the names of directories containing the tags (it is useless to start at the root of the partition) and then to go up to the folder where the files are saved. The different directories must be separated by a backslash (\).
An immediate preview of the result can be obtained by selecting any item in the workspace.
How to identify the pieces by analyzing their acoustic fingerprints?
Section titled “How to identify the pieces by analyzing their acoustic fingerprints?”Even if the file name or path does not contain any usable information, and even if the title of the song or its performer is unknown, it is possible to try to tag the file automatically. Metatogger uses Acoustid technology for this purpose.
Acoustic fingerprint recognition does not allow recovering tags other than Artist and Title. It is true that once the track has been identified, it is tricky to determine which disc it comes from (original album, single, best of, remastered version,…). But it is possible to search for the album from which the track comes from in the database of records.
The identification is launched by a click on the Tag From Fingerprint button on the Tools tab of the ribbon. It can be stopped at any time by clicking on the Cancel link in the program’s status bar.
How to apply a personalized handling on the tags using scripts?
Section titled “How to apply a personalized handling on the tags using scripts?”The tool Edit tags with C# scripts allows the user to apply a personalized treatment on the tags. This tool is based on the use of scripts written in C#. This feature makes Metatogger a very flexible tag editor, because the range of handling applicable to tags is not limited.
By default, Metatogger provides the following ready-to-use C# scripts:
- Search & Replace: replaces a string of characters by another one;
- Use sentence case capitalization: capitalizes the first letter of the tag;
- Use Title Case Capitalization: capitalizes the first letter of the main words;
- MAKE UPPERCASE: capitalizes the value of the tag;
- make lowercase: puts the value of the tag in lowercase;
- Use two digits for track number: inserts a 0 in front of the single-digit track numbers;
- Removes leading zeros in track number: deletes the 0 in front of the track numbers;
- Trim white-space characters: remove superfluous characters before and after the tags (white spaces, for example);
- Remove from values: remove tags if they contain a predefined value;
- Split track number: reassigns the track number, regardless of the total number of tracks on the disc (3/10 -> 3);
- Convert eASCII characters from Latin1 to UTF8: converts the encoding of extended ASCII characters from Latin1 to UTF-8;
- Cyrillic Transliterate - Latin characters: transliterates Cyrillic and Latin characters;
- Autofill disc number: create the Disc number tag if the Album tag contains information on this number in the form “CD X”;
- Split disc number: reassigns the disc number, regardless of the total number of discs on the album (1/2 –> 1).
Default scripts can be modified, but not deleted or renamed. If an unfortunate modification has been made, it is possible to restore one of them by clicking on the Reset link or to restore all of them by resetting the parameters of the software.
A click on the + button, to the right of the script names, is enough to create a new script, which should be named. Metatogger automatically adds a code skeleton, simply returning the tag values without modifying them.
The variable files, to be used in scripts, is of the type IEnumerable<AudioFile>. The AudioFile class contains various properties and methods to manipulate the tags of the checked items in the workspace. It is recommended to use Visual Studio Code to develop your scripts to benefit from automatic code completion (IntelliSense).
The default scripts can be found in the GitHub repository of Metatogger scripts. You can contribute to the enrichment of this repository by proposing improvements to existing scripts or by submitting new scripts, through pull request.
Documentation on the main classes available for Metatogger scripts can be read online at the website luminescence-software.github.io/scripts-doc.
Tagging with the MusicBrainz database
Section titled “Tagging with the MusicBrainz database”How to find the tags in Metatogger’s album database?
Section titled “How to find the tags in Metatogger’s album database?”Sometimes we know some information about the album a track comes from (the title of one of the tracks, the name of the artist or the title of the album), but without this information being mentioned anywhere.
In this case, it might be useful to request a database of records released around the world. Thus, the items could be automatically tagged from information extracted from this database. Metatogger has for this purpose the Get tags from the MusicBrainz encyclopedia tool.
Metatogger has a SQLite database containing nearly 3.5 million albums. The data is provided by the MusicBrainz community.
If the database is downloadable from the Lumisoft site, it is then installed locally on the user’s computer. Thus, the tool can be used without the need for an internet connection.
The database is updated approximately every three to four months. The Update Database button under the File tab will automatically download and install the latest available database if necessary. The number of artists, albums, tracks and covers contained in the database is displayed under this same tab.
How to install the database offline?
Section titled “How to install the database offline?”Metatogger automatically downloads and installs its database from the internet, by clicking on the Update Database button, available in the File tab. However, this requires an internet connection.
It is possible to install Metatogger’s database offline, without an internet connection. To do so, proceed as follows:
- Download the database at this address;
- Make sure that Metatogger is closed, then unpack the database files in the
%LOCALAPPDATA%\Luminescence_Softwarefolder, overwriting existing files if necessary; - Start Metatogger, then click on the File tab, where you should see a message indicating that the database needs to be optimized to improve query performance;
- Then click on the Optimize Now command and wait for the process to finish. The software cannot be closed while the database optimization is in progress.
The tools Get tags from the MusicBrainz encyclopedia and Get covers from the MusicBrainz encyclopedia are now operational. Concerning the Get covers from the MusicBrainz encyclopedia tool, you won’t be able to save, subject to possible already cached covers, an internet connection as the database does not contain the covers themselves but only their internet address.
How to query the records or covers database?
Section titled “How to query the records or covers database?”Querying the database consists of entering information (keywords) about the album you are looking for: its title, the name of the artist, or the title of one of its tracks. All these criteria are cumulative. For example, if I enter Dire Straits in the Artist field and Sultans of Swing in the Title field, Metatogger will return all the Dire Straits albums with a track entitled “Sultans of Swing”.
How do I reconcile the data in the database with the checked items?
Section titled “How do I reconcile the data in the database with the checked items?”Identifying an album would be useless if Metatogger didn’t have powerful reconciliation features with the checked items in the workspace.
If the album selected in the database contains tracks that do not match the items in the workspace, because they have not been copied for example, just click on their title in the result window. Tracks that are disabled in this way will appear in gray and will be ignored when you reconcile them.
Metatogger has four methods to reconcile the information “tracks of the selected album in the database” to the “checked items of the workspace”:
- Consider duration to match files: Metatogger will match the tracks with the same duration. As the exact duration of a song can vary from one version to another, Metatogger will make several passes, gradually widening the tolerance by plus or minus one second, within plus or minus four seconds;
- Consider track title to match files: Metatogger will consider a song as identical if the track title is in the file name of the item;
- Consider order to match files: the first checked item will be associated with the first track of the album, the second checked item with the second track of the album, etc. Very useful when the names of the audio files are track01.mp3, track02.mp3, etc., that you just have to sort in ascending order.
How to add record covers?
Section titled “How to add record covers?”The Get covers from the MusicBrainz encyclopedia tool allows you to search for record covers that can either be embedded directly into the tags or copied to the folder where the file is saved.
Right-click on the thumbnails to export the image.
It is possible to choose the images of your choice by clicking on the link Open covers… or by dragging and dropping them directly into the tool.
Managing audio files
Section titled “Managing audio files”How to rename or sort audio files?
Section titled “How to rename or sort audio files?”The Rename and sort files according to their tags tool allows you to work on the name or path of audio files.
Its use is based on the use of masks, composed of identifiers and conditional blocks, indicating how and where the files should be stored.
If you want to reorganize your media library, you can move files, copy them, or create symbolic links (when the program is started with administrator rights, except with Windows 10 Creators Update (1703) and higher which allows the creation of symbolic links without administrator rights). Metatogger will create directories and subdirectories, if necessary, to reorganize the files.
An immediate preview of the result can be obtained by selecting any item in the workspace.
How to identify possible duplicate files?
Section titled “How to identify possible duplicate files?”Metatogger includes a tool that will search for potentially duplicated audio files using acoustic fingerprint identification technology. Clicking on the Search Duplicates button will group the items by similarity, each identified duplicate being placed in a separate group.
There is a handy trick for identifying potentially duplicate audio files, when the file name differs but the title and artist are the same. Simply group the items by Artist and then by Title. Unless duplicated, there should be only one item per group. Clicking on the Collapse Groups With One Item command, available in the contextual menu of the grouping area, will highlight potential duplicates.
It will then be easy to delete, after verification, the identified duplicates.
How to physically delete audio files?
Section titled “How to physically delete audio files?”To physically delete the audio files in the workspace, simply click on the Delete Selected Items button or on the Delete Checked Items button on the Tools tab in the ribbon.
In reality, the files are not permanently destroyed, but are sent to the Windows recycle bin.